How to Create Websites Right On Your Windows Laptop, Part 1 of 2
Contents
Sticking a web server on your computer is an essential skill that every SEO should have. Not only will this allow you to rapidly develop websites (even at times when you have no internet connection), it will allow you to do some cool things, like scrape sites and script web2.0s in an advanced way, along with imacros. I’ll be doing tutorials on how to do all of these things, but for now we need to get apache, php and mysql installed on your laptop.
I’m going to show you how to install Wamp server. Not only do I use this on my laptop, I also use this to actually host websites. I have many Windows VPS servers, that I use for a variety of things (running scripts, SEO tools and scraping projects), but I also use them to host websites. You can get a Windows VPS from Low End Box and run various scripts on it, as well as host an unlimited number of websites. The particular machine I’m installing today is a cheapie $6.25 per month VPS. I’d say the minimum you’re going to need is a Gig of RAM, and a minimum of 40 Gigs of hard drive space (which will end up being around 8 Gigs because of what the operating system uses.
Step 1: Install Visual C++ Redistributable
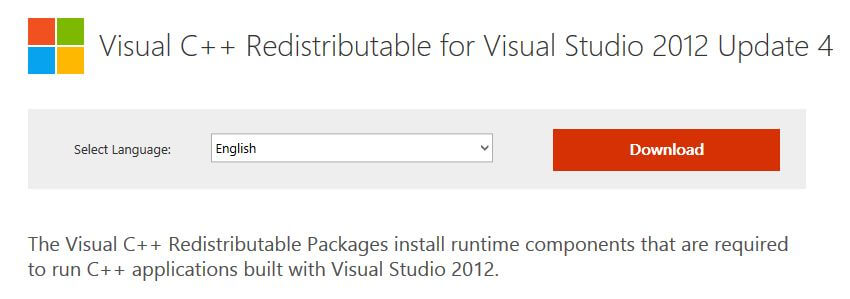
Decide whether your operating system is 32 or 64 bit. Install the Visual C++ 2012 Redistributable from Microsoft. If you happen to skip this step, you’ll notice that you get a MSVCR100.DLL (32 bit) or MSVCR110.DLL (64 bit) error, and will have to uninstall Wamp and start all over again — so make sure that you have the appropriate Visual C++ version installed. If you’re on a 64 bit machine, put a check mark next to “VSU_4\vcredist_x64.exe”, download and install it. If 32 bit, check next to “VSU_4\vcredist_x86.exe” and install. Don’t worry about other options.
Step 2: Download and Install Wamp Server
 Visit Wamp Server and install either the 32 or 64 bit version, depending on your operating system. Somewhere the installation will ask you which browser you want to use, navigate and select the .exe of your favorite browser. This will be the browser which is used to open up phpmyadmin later.
Assuming that you first installed the Visual C++ Redistributable, click start and run Wamp Server. The icon should show green. Take note that web servers operate on port 80. For Wamp to start, port 80 must be free. Skype, for no valid reason, likes to take over port 80. Therefore, if you’re running Skype, close it first. Then start Wamp server. Next, you can start Skype again once your Wamp server icon is green.
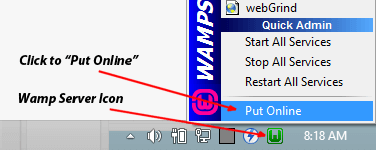
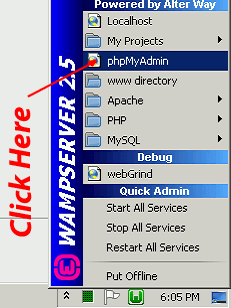
Step 3: Put Wamp Server Online
This is something you only have to do once. Click as indicated in the image below.
Step 4: Verify Wamp is Working Properly
Open a browser, and in the address put this: 127.0.0.1. Visiting that page should show you something that looks like this:
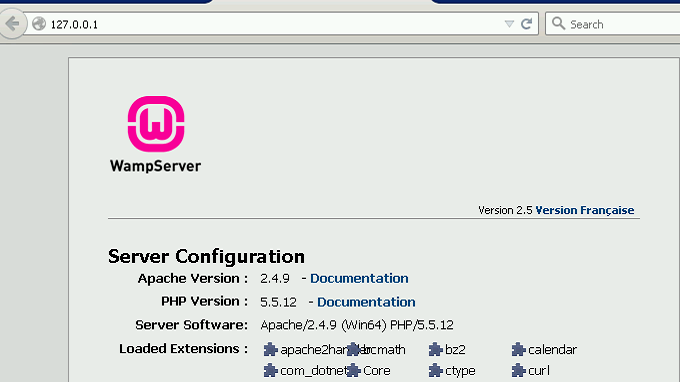
Congratulations, Wamp Server is installed properly!
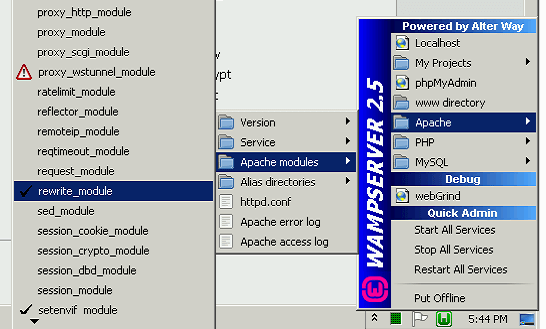
Step 4: Enable Mod Rewrite
Mod Rewrite allows your server to do permalinks with keywords in the URL, in WordPress. If you don’t enable this feature, installing WordPress and then trying to switch permalinks will result in a failure. To enable mod_rewrite, click as demonstrated below.
Step 5: Set a Password for mySQL Server
There are two parts to this step. First, you will open up phpmyadmin and do a query that will change the root password of mySQL. Next, you’ll have to edit phpmyadmin’s config and put that new password in it, so that you can continue using phpmyadmin. First, open up phpmyadmin as indicated in the image below.
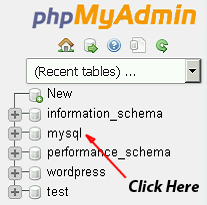
Next, click on the “mysql” database, as shown below.
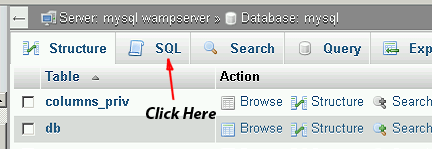
Thereafter, click on the “SQL” tab.
Here, you will paste in the following SQL statement, then click “Go”, where “mypassword” is the password you want to use.
SET PASSWORD FOR ‘root’@’localhost’ = PASSWORD(‘mypassword’);
After you click “Go”, your mysql password is now changed. This will prevent you from using phpmyadmin, until you tell it what the new password is. If you used a default installation path, the location of the file you need to change is here:
C:\wamp\apps\phpmyadmin4.1.14\config.inc.php
Note that the “phpmyadmin4.1.14” could change in the future as versions with new release numbers are continually upgraded. Whichever the phpmyadmin folder is, the file you want to edit will be named “config.inc.php”. Next, edit the password line. Scroll down until you see this: $cfg[‘Servers’][$i][‘password’] = ”; — on that line, you will insert your password inbetween the ”, so that it looks like this:
$cfg[‘Servers’][$i][‘password’] = ‘mypassword’;
Substitute “mypassword” with the password you used with mysql. After you have saved it, click the green W icon for Wamp Server, and select the “Restart All Services” line. mySQL now has a new password, you will use this when installing WordPress.
Step 6: Set Up a Domain on Your Laptop
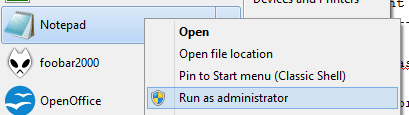
Next, we’re going to do a trick to make your computer think a domain is located on it. Think up any domain name you want to develop. Open up the c:\windows\system32\drivers\hosts file. We’re going to add your domain into the file. Depending on your version of Windows, that file may be protected against saving — you may have to open up notepad with administrator privileges. Right-click on notepad to see the “run as administrator” option. See the image below.
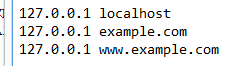
Once you open the hosts file, scroll down and you will see this: 127.0.0.1 localhost. That line tells the computer that “localhost” is located at 127.0.0.1 (which is always the address of your computer). We’re going to add another line there, just underneath this line. You will make it 127.0.0.1 domain, where domain is the domain you would like to create. You should make 2 lines like this, one with www, and one without. Below I use “example.com” in the following image:
Once you have added your domain, save the file. Next, we’re going to open up a dos prompt. Click on start, and (depending on your Windows version), you’ll either click to open a dos box (older versions), or if you see where you can type a program, type in “cmd” and press enter. This opens up a black dos box.
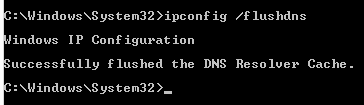
If this is a domain that already exists on the internet, you want to now flush your cache — to let your computer know to look for a domain in the new place. To do this, you’ll type in the dos box: ipconfig /flushdns. After pressing enter, you should see the following:
Next, test that your domain is now located on your own computer, by pinging it. You’ll type in: ping example.com (where example.com is the domain you saved in the hosts file above). You should see the following.
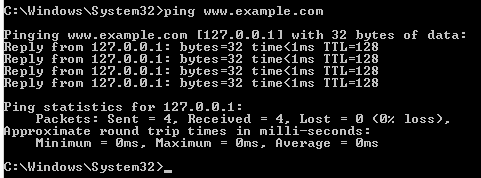
If you see that 127.0.0.1 was pinged for your domain, congratulations — that means that your computer now thinks that domain is actually located on your computer. Now we can develop that domain right on your laptop! Next, lets tell Apache web server that there is a new domain for it to handle. We’ll do this on the next page of this article.

Comments