How to Create Websites Right On Your Windows Laptop, Part 2 of 2
This is part 2 of how to create websites right on your computer, or your windows VPS. The last page ended discussing that we’re going to tell Apache that your website is now located on your computer. We will create a directory for your new domain, as well as configure Apache so that it knows your site is there.
Step7: Configure Apache for Domains
Wamp server is going to want to open your Apache config file into notepad.exe. Notepad is horrible for showing this, 9 times out of 10 you’ll just see a bunch of lines all mushed together, because notepad.exe can’t understand the line-feed new line symbols in the config file. I highly recommend you download and install Notepad++, so we can use that as your editor.
Next, we will edit the Wamp server config file, telling it to use Notepad++ as your editor. If you used the default installation directory for Wamp, your configuration file would be located here: c:\wamp\wampmanager.conf. When you open that file up, you notice this line: editor = “notepad.exe”. We’re going to change this to notepad++. On my computer, the location of Notepad++ was here: C:\Program Files (x86)\Notepad++\notepad++.exe. Therefore, I edited the line to be as follows:
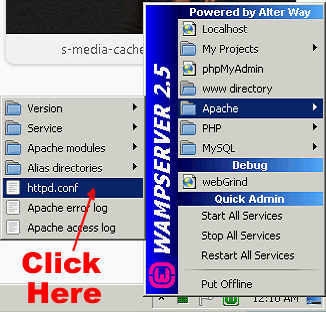
editor = "C:\Program Files (x86)\Notepad++\notepad++.exe"After saving the file, and restarting Wamp server, it now loads all text documents in Notepad++. Let’s now edit your Apache config file. You can select it as shown in the following image:
Now we are going to add domains to Apache. This is something different than most people do — they rely on cPanel for adding domains to a server. We’re going to do the same with a few lines of text in the httpd.conf file.

Scroll all the way down to the bottom of the httpd.conf file. The last line of text is probably “Include “c:/wamp/alias/*”. Just underneath that, put this:
NameVirtualHost 127.0.0.1

<VirtualHost 127.0.0.1>

ServerName example.com

ServerAlias *.example.com

DocumentRoot "c:/wamp/www/example.com"

</VirtualHost>
That’s it! Save the file. Next, make sure the c:\wamp\www\example.com directory actually exists., then click on the green W icon and select “restart all services”. Your computer is now configured to serve domains! Visit the domain you added to the hosts file in the previous article, and you’ll notice it is an empty directory, waiting for you to install WordPress.
Before I continue, let me elaborate a bit on this Apache httpd.conf file. That 127.0.0.1 is for when you’re creating websites on your own computer. It is possible to use Apache to professionally host domains on the internet. Many of you are buying VPS for the purpose of operating SEO tools. You can also use that VPS to host domains. The difference, is that instead of using 127.0.0.1, you will paste your server’s IP. If your server has multiple IPs, you can host on any of them. Let me show you how this is done.
The line that starts “NameVirtualHost 127.0.0.1”, you only use this once per IP address. Underneath that, you put the VirtualHost code (the 5 lines of code above). If you are hosting 2 or more websites, simply add another block of code for that domain. I’ll give an example below. This example is assuming you’re hosting 3 domains on 2 different IP addresses. Your IPs are 12.34.56.78 and 23.45.67.89, and the domains are example1.com, example2.com and example3.com.
NameVirtualHost 12.34.56.78


<VirtualHost 12.34.56.78>

ServerName example1.com

ServerAlias *.example1.com

DocumentRoot "c:/wamp/www/example1.com"

</VirtualHost>

<VirtualHost 12.34.56.78>

ServerName example2.com

ServerAlias *.example2.com

DocumentRoot "c:/wamp/www/example2.com"

</VirtualHost>


NameVirtualHost 23.45.67.89


<VirtualHost 23.45.67.89>

ServerName example3.com

ServerAlias *.example3.com

DocumentRoot "c:/wamp/www/example3.com"

</VirtualHost>
By saving a httpd.conf file with the above text, your server would serve 2 websites from IP 12.34.56.77, and one website from 23.45.67.89. You could literally host 1000s of websites like this, on 100s of different IP addresses. We don’t need no stinking cPanel! After editing your file, reboot the server to make the new domains take effect. Again, make certain that all the referenced “DocumentRoot” folders actually exist, or Wamp Server’s icon may not go green when you start it up.
Note that the ServerAlias begins with an asterisk (*). This is a wildcard. This would allow you to host an unlimited amount of subdomains from the same directory. You could also use “www”, instead of *, if you know you will only be using the www subdomain.
Step8: Install WordPress
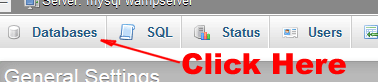
Remember from our steps from the previous page, we changed the password of the mySQL server. We will need that soon. Next, lets open phpmyadmin and create an empty database. This database will soon hold your WordPress tables. Click the green W Wamp Server icon, and select “phpmyadmin”. Once open, click on the “Databases” tab as shown below.
Next, think up a database name. You will need to remember this name as we install WordPress.

Download WordPress. When you open up the zip file, you will copy the files directly to the directory you made for your domain, under c:\wamp\www. Copy the files, paste them into that directory.
During the installation, you will be asked this:
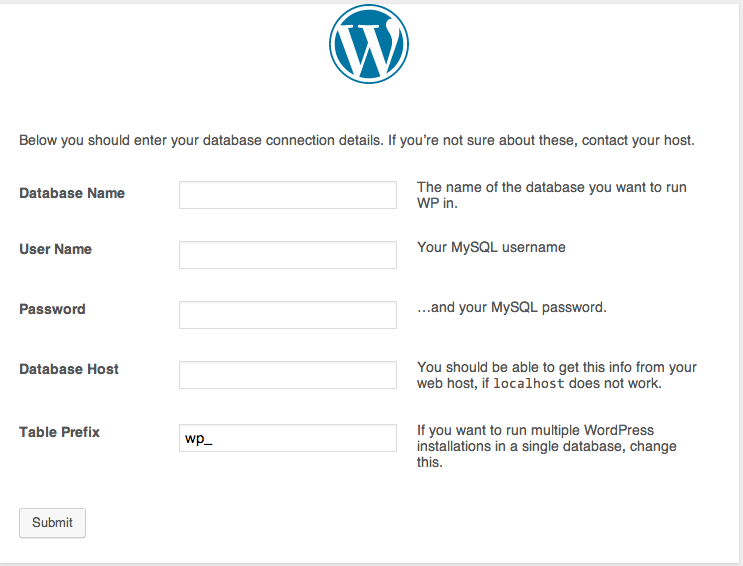
The database name is the name you created above in this step 8. The user name will be “root”. The password will be the password you created, when we gave mySQL a password on the previous page, for step 5. The Database Host will be “localhost”. You can keep Table Prefix the same. Then click submit.
Congratulations! You have just installed WordPress. You can continue to write articles and develop your website directly on your computer (or VPS). You can use this to pre-develop a domain you haven’t even purchased yet, so that when you buy the domain it is ready to put up.
Lastly, now that you have a working PHP installation on your machine, there’s all kinds of cool things we can do. I’ll be writing tutorials on how to do scraping, and writing imacros scripts that pull data from php and a database. For now, though, enjoy developing WordPress sites directly on your computer.

Comments